Hi this is Team Merchant Navy Decoded !!!

Please fill the below form with your query and we will get back to you in next 12 hours.

Rest assured your data is safe with us !!!🙂

Ask Your Query

Purifier Overhaul Procedure

A purifier does its job at extreme speed; the bowl spins somewhere in the range of 8,000 to 10,000 RPM depending on make and model, driven from a motor running at a fraction of that speed through a gear or belt arrangement. Anything spinning that fast, continuously, separating oil, water, and sludge under real centrifugal force, is going to need a proper teardown on a planned schedule, not just when something finally fails.


Purifier Overhaul Procedure

Before Any of It: Isolation and Permits

None of this starts without the basics done properly first.

  • Stop the purifier and isolate the electrical supply, tagging it out
  • Shut and isolate the feed, discharge, sludge, and operating water valves
  • Obtain a permit to work if required by the vessel’s safety management system
  • Confirm standby purifier availability if this unit is taken out of service on a running system that needs continuous purification

How the Drive Train Actually Works

Before pulling anything apart, it’s worth having the drive chain straight, since both the vertical and horizontal shaft sections depend on understanding it.

The electric motor drives a horizontal shaft through a friction clutch (or, on some designs, an elastic drive belt instead of a shaft at all). That horizontal shaft carries a worm, meshing with a worm wheel on the vertical shaft, which steps the speed up significantly and carries the bowl at the top. The worm is typically hardened steel; the worm wheel is usually phosphor bronze, chosen specifically to wear against the harder worm rather than the other way around.

The friction clutch matters more than it looks: it lets the heavy bowl assembly come up to speed gradually rather than shock-loading the motor and gearing on every start.

Horizontal Shaft Overhaul

Dismantling:-

  1. Disconnect the drive coupling or belt from the motor
  2. Remove the friction clutch assembly, inspecting the friction pads/linings for wear
  3. Withdraw the horizontal shaft, noting the worm’s condition and mesh pattern with the worm wheel
  4. Remove and inspect the horizontal shaft bearings

What to check:

  • Friction clutch linings for glazing or excessive wear – A slipping clutch shows up as slow, sluggish run-up to speed
  • Worm teeth for pitting, scoring, or uneven wear pattern, which often points to a misalignment issue rather than the worm itself being at fault
  • Bearing condition and clearance, replacing per the maker’s wear limits rather than by feel

Reassembly:-

  • Fit new gaskets and seals at every disturbed joint
  • Confirm correct backlash between worm and worm wheel per the manufacturer’s specification too tight causes overheating and rapid wear, too loose causes noise and shock loading
  • Refit the clutch and confirm smooth engagement before closing up

Table of Contents

Vertical Shaft Overhaul

The vertical shaft is the component actually carrying the bowl, supported by bearings top and bottom, running inside an oil bath that lubricates it automatically as long as oil level is correctly maintained.

Warning signs that it’s time to open this up: excessive vibration, unusual noise, hot bearings, oil leakage, or a general drop in separation performance. Waiting for an obvious symptom before scheduling this work is generally the wrong call  most overhauls happen on a planned interval rather than reactively.

Dismantling sequence:


  1. Remove the bowl assembly first – Never attempt vertical shaft work with the bowl still fitted
  2. Open the gear housing
  3. Remove the locking components and bearings
  4. Withdraw the vertical shaft carefully, without forcing it – A shaft that doesn’t come free easily usually means something’s still locked or misaligned, not that it needs more force
  5. Keep every removed part arranged in the order it came out, since reassembly sequence matters and small shims or spacers are easy to lose track of

Checks during overhaul:


  • Inspect the shaft for straightness – Even a small bend shows up dramatically at these rotational speeds as vibration
  • Check bearing surfaces on the shaft itself for scoring or wear, alongside the bearings being replaced
  • Confirm the oil bath is clean and refilled with the correct grade before closing up, since this is the shaft’s only lubrication source

Alignment matters here more than almost anywhere else in the machine. A vertical shaft running even slightly out of true doesn’t just wear faster  it transmits vibration into the whole frame, accelerating wear on components that had nothing to do with the original problem.

Water Chamber and Gravity Disc

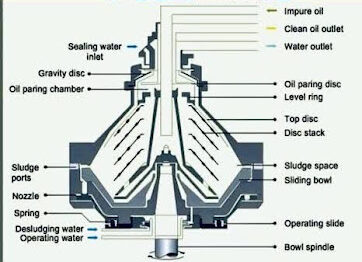
The water chamber, sitting above the disc stack, is where the purifier actually separates oil from water using nothing more than a density difference and a carefully sized disc.

How it actually works: the gravity disc’s inner diameter sets where the oil-water interface sits inside the bowl. Get that diameter wrong, or fit the wrong size disc for the oil being processed, and the consequences go in a very specific direction depending on the error:

Gravity disc issue 

Result 

Diameter too large 

Oil-water interface shifts outward; oil escapes through the water outlet 

Diameter too small 

Interface shifts inward; water escapes through the oil outlet 

Choosing the right disc isn’t guesswork – It’s calculated from the oil’s density and the desired throughput, typically using a nomogram provided in the purifier’s manual rather than picked by habit or carried over from the last fuel grade without checking.

During overhaul, check:-

  • The gravity disc and paring disc for wear, pitting, or damage to the sealing edge
  • The water seal itself  sealing water seals both the water outlet and prevents oil from overflowing into it, so a compromised seal here defeats the entire separation process
  • Correct bowl height and vertical shaft height, since both directly affect the space available for the water seal  too little space and the sludge port won’t close properly, allowing water to leak through it

If water washing is used ahead of the purifier a common technique for removing acids and salts from straight mineral oils the injected water rate (commonly 3–5% of oil flow) continuously renews this water seal, which is worth keeping in mind when troubleshooting a seal that keeps failing despite looking fine on inspection.

During overhaul, check

Bowl Overhaul

The bowl is the heart of the machine, the rotating assembly actually doing the separation  and it comes apart in a specific order that shouldn’t be improvised.

Dismantling:

  1. Remove the lock ring securing the bowl hood to the bowl body, using the correct clamp tool rather than an improvised wrench
  2. Lift off the bowl hood
  3. Remove the disc stack as a unit, keeping the discs in their original order and orientation
  4. Remove the distributor and top disc
  5. Inspect the sliding bowl bottom (on self-cleaning designs) and its sealing surfaces

What to inspect and clean:

  • Every disc in the stack, checking for cracking, deformation, or heavy sludge/scale buildup that reduces effective separation area
  • The bowl body and hood mating surfaces, since these need a clean, undamaged seal to hold operating pressure correctly
  • O-rings and gaskets throughout  these are wear items, replaced as a matter of course during overhaul rather than reused unless clearly still serviceable
  • The sliding bowl bottom’s operating water passages, on self-cleaning bowls, since fouling here directly affects how reliably the bowl desludges

Reassembly:

  • Discs go back in the same order and orientation they came out  this isn’t cosmetic, disc stacking affects flow pattern through the bowl
  • New gaskets and O-rings fitted throughout
  • The bowl hood locked down evenly and fully, confirmed with the correct tool, before the bowl is refitted to the vertical shaft
  • Rotate the bowl by hand once assembled  if it doesn’t turn freely, or a scraping noise is heard, something is misaligned or a component (commonly the inlet pipe) isn’t correctly seated, and it needs to come back apart rather than being run anyway

Re-Commissioning After Overhaul

Before starting the purifier back up, a few checks are worth treating as mandatory:

  • Confirm every fitting is correctly seated and the bowl hood is properly locked
  • Rotate the assembly by hand through its full drive train, checking for free movement without binding or noise
  • Refit any safety devices removed during the work
  • Start the purifier and bring it up to speed gradually, watching for vibration, noise, or abnormal bearing temperature before introducing any oil feed
  • Only once the bowl is confirmed running smoothly at full speed should feed and operating water be introduced, following the machine’s normal starting sequence

Conclusion

A purifier overhaul isn’t really four separate jobs – The vertical shaft, horizontal shaft, water chamber, and bowl all depend on each other working correctly at once. A worn worm wheel throws off the vertical shaft’s smooth running. A shaft running slightly out of true undermines the precision the water chamber depends on. A gravity disc sized without checking the manual defeats the separation the whole bowl exists to do. Treat the overhaul as one connected system rather than a checklist of parts to swap, rotate everything by hand before trusting it to run at speed, and a purifier will keep doing genuinely demanding, high-speed work reliably between one planned overhaul and the next.

Frequently Asked Questions (FAQs)

An electric motor drives a horizontal shaft, which turns a worm meshing with a worm wheel on the vertical shaft, stepping speed up significantly to spin the bowl. A friction clutch sits between the motor and horizontal shaft specifically to let the heavy bowl assembly come up to speed gradually, rather than shock-loading the motor and gearing on every start.

Too large a diameter shifts the oil-water interface outward, letting oil escape through the water outlet. Too small a diameter shifts it inward, letting water escape through the oil outlet. The correct size is calculated from the oil’s density and desired throughput using the manufacturer’s nomogram, not chosen by habit.


The shaft runs at very high rotational speed carrying the bowl assembly, so even a slight misalignment shows up as vibration that’s transmitted through the whole frame, accelerating wear on components well beyond the shaft itself.

Disc stacking order and orientation affect the flow pattern of oil through the bowl during separation. Reassembling them in a different order can compromise separation efficiency even though the discs themselves look identical.

That every fitting is correctly seated, the bowl hood is properly locked using the correct tool, the assembly rotates freely by hand without noise or binding, and any removed safety devices are refitted  followed by a gradual start-up to full speed before introducing oil feed or operating water.

Disclaimer :- The opinions expressed in this article belong solely to the author and may not necessarily reflect those of Merchant Navy Decoded. We cannot guarantee the accuracy of the information provided and disclaim any responsibility for it. Data and visuals used are sourced from publicly available information and may not be authenticated by any regulatory body. Reviews and comments appearing on our blogs represent the opinions of individuals and do not necessarily reflect the views of Merchant Navy Decoded. We are not responsible for any loss or damage resulting from reliance on these reviews or comments.

Reproduction, copying, sharing, or use of the article or images in any form is strictly prohibited without prior permission from both the author and Merchant Navy Decoded.

DIWALI SALE

Decoded Discount Alert! up to 50% OFF

DIWALI SALE

Decoded Discount Alert! up to 50% OFF

Use Coupon Code Deep50

Days
Hours
Seconds
0
Would love your thoughts, please comment.x
()
x